Pages

Showing posts with label pizza. Show all posts

Sunday, October 7, 2012

A Week in Pictures (#2)

White Spotted Jumping Spider 9/30/2012

This is also known as the Daring Spider. I was finally able to snap a decent picture of one of these guys. These scare me half to death half the time because they will make sudden movements like they are going to attack me. I always scream and then fuss at them. Ha! They don’t spin webs; but, they do jump quite a distance. They are hunters and lightening quick.

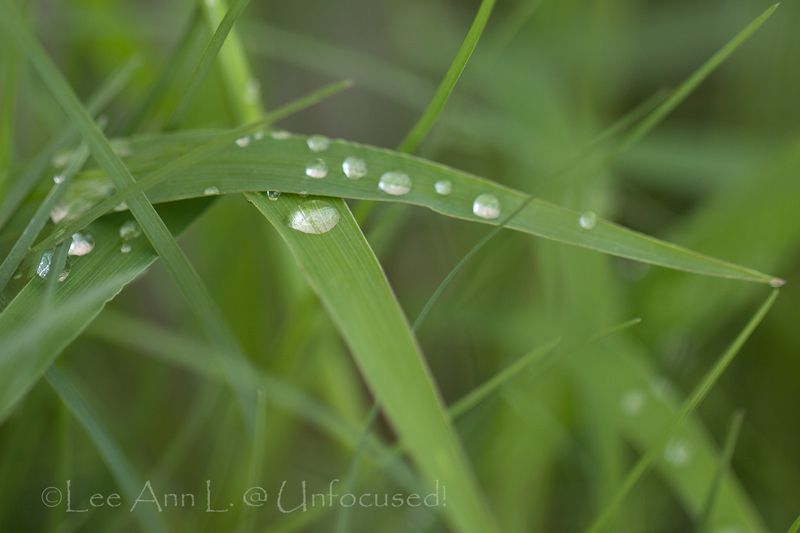
After the Rain 10/1/2012

{To see a larger picture, go here.}

It rained steadily for approximately 30 minutes – a very good thing hereabouts.

First Homemade Pizza at the House 10/2/2012

The pepperoni is not our usual brand as I could not find what we like best. So, it was greasier and spicier than usual. Also, the oven is a little weird and It doesn’t cook evenly.

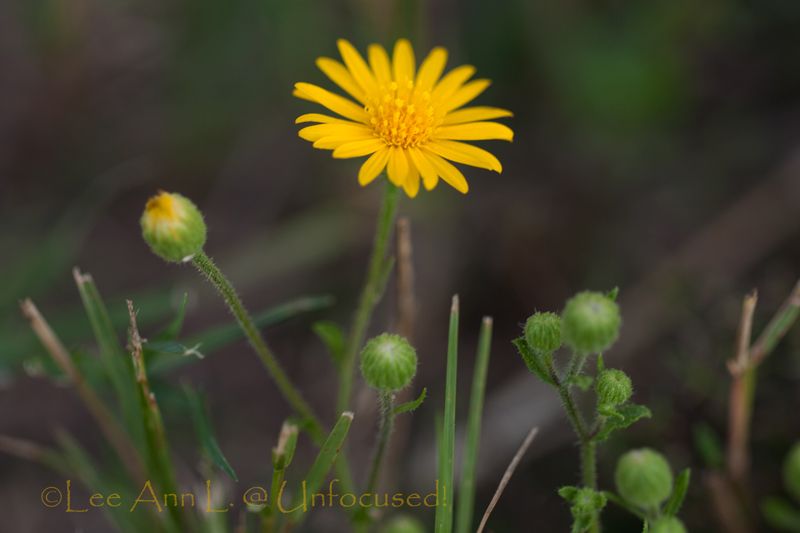
A Beautiful Weed 10/3/2012

{To see a larger picture, go here.}

Gracie sacked out 10/4/2012

On MY computer bag which was on the ottoman.
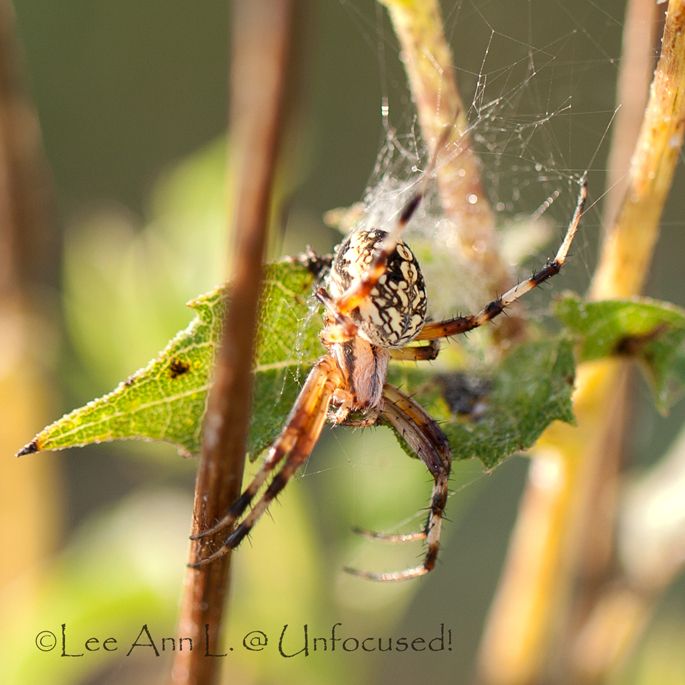
Garden Spider

{To see a larger image, go here.}

I believe this is a juvenile Western Spotted Orb Weaver. I was walking to the mailbox around 9:00am with my camera on hand. I suddenly spied something moving in a sparse wild bush in our front yard. At first, I thought it was a weird flying insect; but, as I cautiously approached for a closer look, I realized it was a spider. These things are seriously sick (scary) full grown; but, they are harmless. These spiders are very beneficial critters in the yard. So, I leave them alone.

Hiding {Moth} 10/6/2012

{Estigmede Albida is probably the name of this one.}. This beauty was found in the bed of Dan’s truck while we were loading it up with stuff. I found a yardstick and gently persuaded it to get onto the end and then moved him into bushes in a shady spot. I do not think it will survive because it had a damaged wing. But, it was a shy beaut.

Saturday, May 22, 2010

Fun in the Kitchen III (Pizza! Pizza!)


Pizza Sauce: Fun in the Kitchen I

Pizza Dough: Fun in the Kitchen II

This pizza was made the Tuesday after we made the pizza dough.


The cast of characters for making the pizza itself.


A little flour on the surface you plan to roll dough on goes a long ways. My man usually does this for me as he’s a little better at it than me.


Roll the dough into the size you want. It doesn’t have to be perfectly round. In fact, this one came out a little more rectangular than circular.


We make our pizza right onto the pizza peel. So, we put a little corn meal on it before placing the dough on top. This helps it slide right off the peel onto the baking stone in the oven.


Roll up the edge of the dough. I found that I like smaller crusts. So, mine tends to be small. Others like larger crusts. My man doesn't even bother rolling it up when he makes his personal pizzas. It all depends upon your tastes and preferences.


Dab a little olive oil onto the dough before placing ingredients on top. The olive oil acts like a barrier and is supposed to help the dough from getting soggy from the sauce and whatnot. We found this to be true in the instances we forgot to do this step.


Spread some pizza sauce onto the dough. This was fresh pizza sauce I had made earlier, which is why it is in a bowl. If you stored the pizza sauce in a baggie, thaw it out it and/or bring it to room temperature first. Clip a corner of the baggie and squeeze out the sauce onto the dough and spread it out by whatever utensil you heart desires to use.


We tend to use about 1 ½ cups of Mozzarella, ¼ cup of Parmesan, and ¼ cup of Romano. We try to get block cheeses and grate them ourselves. But, it’s hard to find block cheeses at either Wal-Mart or HEB nearby. We would have to make a special trip to Whole Food Market to get them and sometimes, they don’t even have them!

Also, the types of cheeses used are a personal taste thing. We found through experimentation that we like this mixture best. You'll need to experiment to discover what you like best. I think some members of my family use Mozzarella only. I guess I have refined tastes. Ha!

Anyway, we spread 1 to 1 ¼ cup of Mozzarella onto the pizza first.


Then the parmesan goes on…


And then Romano goes on… I found this in block size at Wal-Mart, which is why I am using the Microplane grater. And yes, I always wing it (estimate the portions).


Place pepperoni on top. I love pepperoni. Use whatever toppings your heart desires. We’re going to try a BBQ Chicken pizza someday soon. It’ll have BBQ sauce instead of tomato, provolone cheese instead of mozzarella, and chicken with onions instead of pepperoni. I saw this mixture in a recipe in one of the food magazines I get and thought it sounded delish.


And then, we put the rest of the Mozzarella on top. Yummo!

We’ve been throwing it onto a baking stone in a preheated 450 degree oven for about 10 minutes. By the way, we used 400 degrees in our oven back at the house we used to have in Houston. So, you’ll have to experiment to get the right temperature for your temperamental oven.


This is what our pizza looks like when it’s done. It tastes a lot better than it looks.


Cut it up and enjoy.

Friday, May 7, 2010

Fun in the Kitchen II (Pizza Dough)


I blogged about making Pizza (or Tomato) Sauce way back in January.

Well, several weekends ago, we got together to do another photo shoot. This time it’s pizza dough. For some odd reason, I was a little nervous and/or ditzy this time around. I kept messing things up a little; but, all in all, everything turned out just fine.


Yes, this recipe came from the same book the Pizza (Tomato) Sauce came from.


The Cast of Characters for making Pizza dough.


Measure ½ cup of warm water (about 110 degrees). Stir in about 2 tsp of light brown sugar. The sugar actually helps proof the yeast. Dump in two packets of the active dry yeast. Stir.


And, set it aside for approximately 5 minutes.


Meanwhile, measure out 4 cups of flour…


And, 1 tsp of salt…


Sift them into a large bowl. One of these days, I’ll be a proud owner of a nice large sifter. In the meantime, I make do with a small sifter and divvy it up by the cupful.


Make a depression in the flour mixture.


Add 3 Tbsp. of olive oil.

From here on, I kind of messed up the process (order of doing things). But, the dough still turned out fine. You’re supposed to add a cup of warm water here. But, I forgot. That came later. Oh well, it is okay because it still worked!


By this time, the yeast will have risen (become frothy). Pour that into the flour mixture.


I started mixing up the ingredients and quickly realized that something was off. Oh yeah, the cup of warm water!


Because of my mistake, I struggled with sticky dough all over my fingers. What fun. NOT!


Dust the surface (with flour) on which you will be kneading the dough and start kneading. You will need to do this for 8 to 10 minutes.


As you can see, I don’t knead dough properly. I tend to knead dough with one hand slightly on top of the other, making my left hand sore.


A close-up shot of… Whoa! Those are masculine looking hands! Not mine. Who could they belong to?


It’s Dan my man. What a switch. We often do this when we make dough together. I start, he finishes. I took over the camera and snapped a few shots of him working in the kitchen. Not bad shots if I say so myself.


Form the dough into a ball when you are finished with the kneading process. It doesn’t have to be perfect…


Rub some olive oil in a large clean bowl…


Place the ball into the bowl rubbing the olive oil all over it too.


Cover with a clean cloth and let rise for approximately 1 ½ hours. It does best when place in a warm and draft-free place. I usually use the oven…

(Intermission)

Wow! It has risen! Hallelujah!


Beat it back down, gently of course.


Form into a ball and divvy it up into portions. The book says it makes two thin crust pizzas, 12” each. Well, our pizzas are not quite that large and besides, I like thin, I mean thin, crust pizza. So, we divvy ours up into thirds instead of half.

By the way, that gadget I’m using is one handy dandy tool. It not only divides up the dough nicely, it also scrapes up the residue of dough off the surface we used to knead on. Works great!


Place the dough into baggies and throw them into the refrigerator or the freezer. By the way, we divided up a third into thirds this time around so that Dan could make individual pizzas during the weeks I’m out of town (visiting Mother). Anyway, we typical throw a batch in the fridge while the others go directly into the freezer.

Let the dough come to room temperature before rolling it out and using. If it is at room temperature, it is much easier to roll out. Save yourself – let it come to room temperature. Trust me on this one. I know. Rolling out cold dough – it doesn’t work out very well.

Added May 2010: Fun in the Kitchen III (Pizza! Pizza!